“Pretty-sad”…A make up look that is all about being sad…

I grew up in the 90’s…a decade that was marked with uncertainty for the youth in a baby boomer run society, and the idea that kids might not be okay. Teenagers were involved in the culture of sad, dealing with depression and anxiety. The 90’s culture, music, shows, movies made being sad more visible in the mainstream. Present day, it seems as if a new generation of happy, well adjusted teens has since replaced the stringy hair, grungy, plaid-clad youth of my teens. And so…as homage to my youth I created the “pretty sad” make-up look.

What is the “pretty sad” make up look? It’s the way one might look after crying and realizing there is no escaping life or destiny. Eyes are red from crying, perhaps at unrequited love, and make-up is not perfect. Half covering up the emotional damage, half smeared and old. Pretty sad is about looking little unwell, fragile and affected. And in a way, I think it’s pretty cool. Sometimes one has to let sadness and weakness surface…as a means to purge these feelings. After all it is much better to look sad than to actually be sad!

Sad Girl Make-up Steps:

  1. Prep and even out the face. Here’s the time to use a tinted moisturizer or a sheer coverage foundation/bb cream. Set with a light dusting of face powder. Why go so sheer? This look is about looking undone. So some facial flaws and blemishes actually look right.
  2. Eyes: The eye make-up will sell this look. What is needed in a good shadow base, and then pinky red eye shadow over the top lid and line the bottom lid too. It gives the eyes a slightly irritated look. As if tears were shed not too long ago! Also line the bottom lid with a thin line of dark shadow as if a liner was once there but has since been cried off.
  3. Liquid liner: Here’s the fun part…don’t do a perfect line. make it blotchy, make it smudged. As if the eyes were wiped a few times with tissues.As if eye liner was quickly reapplied. Get creative with it.
  4. Smudged mascara: use heavy coats of mascara and before it dries, blink eyes tightly together and voila…it’s a smeared, cakey mess!
  5. Blush just on the nose: Ever cried and had a red nose? Yes! Take some blush and power the tip of the nose, the nostrils and the undersides. It’s cute in a pouty way.
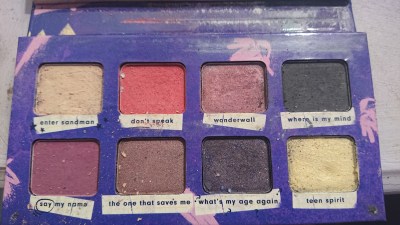
This is the “I’m with the band” palette by Essence makeup. See the red shadow in the middle top row? That’s the one to use for a sad makeup look.
Lookin’ like a mess, but feeling ok. Sad make up at its best.

And there you have it. The make-up look that speaks of the melancholic pain that haunts the soul. Have the eyes of a poet, while having the elegance of a made up face! I did this look for school last week and my instructor commented on how I looked sad that day. But the truth was, it was all cosmetic and I was simply celebrating the right and beauty to let oneself be sad.


Beauty and the Beach: what I wore on holidays…

So, for the longest time, I heard that one’s not supposed to wear make-up on the beach, because it slides, it cakes, it runs, and it’s the opposite of the beach image ideal; which is to have a no make-up, but have a fresh tanned face…but I disagree. On my first trip ever to the Caribbean this holiday season, I did wear a full face make-up and am soooo glad I did. Nobody wants to have a puffy face, blemishes, and undefined eyes. In photos, these are expensive memories, and I wanted to look my best. Here are my top tips for wearing make-up for the beach, including water proof make-ups that can be worn during dips in the sea/pool!

Tips on makeup for the beach:

  1. Foundation? yes please! Don’t be afraid of wearing heavy foundations…the reason being that it can be mixed with sunscreen for more translucent coverage and it won’t look too “done up”. I used my Revlon Youth FX foundation mixed with cream concealer (for extra coverage) since I was cutting it with a sunscreen too. After mixing the three products in my hand I rubbed it generously, but evenly on my face, being sure to smooth streaks. Then a good dusting of face powder to set the base. It looked natural and was protecting me from the sun! I didn’t reapply sunscreen to my face during the day, so I banked all my protection on a thicker, more water resistant application in the morning.
  2. Eye shadow…waterproof is hard to find! I always like a bit of colour on my eyelids because it’s just a nice accent for a beachy, but fashionable look. I couldn’t find waterproof eyeshadow, so I used an aqua colored soft pencil all over the lid and set it with aqua power shadow. This lasted me through several dunks in the sea! Just powder shadow works too, but is less long lasting,..
  3. Eye liner! Waterproof is necessary since it will run and smear everywhere if not, especially black eyeliner. I found a 24 hour water proof gel liner by Benefit that did the job nicely. I got to wear a cat eye look everyday, which made all the difference in photos by helping my eyes pop.

    After a dip in the ocean, my liner, blue shadow and mascara seem to still be entact. Score one for make-up!
  4. Mascara: Waterproof formulas are easy enough to find…I used a Revlon make for lengthening, but volumizing would have worked great too. It looked nice, didn’t flake or run at all. Mascara is very essential make-up for the beach and not something to skip. I look more awake and my eyes look wider when I wear mascara, which will make vacation photos look better!
  5. Honorable beach make-up mentions:  blush and tinted lip balms with sunscreen; blush, if done in powder form will probably wash off with enough sea water and pool water, but is still flattering on skin when the sun is out. Tinted lip balms are also amazing in that they offer moisture, shine and color in a subtle low maintenance way! Just remember to reapply.

    Here I am without bright eye shadow…but still with foundation, liner and mascara. I like that I look natural in photos, but my features are accentuated!

At the end of the day, wear the amount of makeup that is comfortable for the beach. But I wanted to say that there are no rules when it comes to the amount and kind of make-up to wear…as long as there is sunscreen and waterproof versions of basic products, why not wear a bit of color to the beach to add to the beauty of the surf, with beauty of the face.

Go dark brunette, without a regret!

I love playing with hair color as one can probably tell from all my posts about hair dying over the years…I feel nothing feels fresher than a change of color. Natural black hair is gorgeous, but after a year of playing with lightener, aka bleach/peroxide, I have rocked lighter hair color all summer in the way going“bronde”, which is a very light brown. Being a dark brunette, I could never go to light butter blonde without killing my hair, but in general I have been wearing much lighter colors than I was born with.

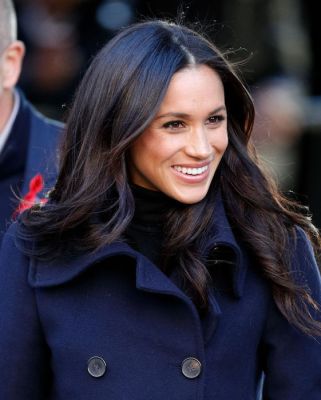
But a recent resurgence in the brunette hair color has come about…basically because of the royally babe-alicious Meghan Markle. I think she really showed the world how amazing dark brown hair can be since getting engaged and married to Prince Harry really put her in the spotlight.. She set the bar high for a representation of brunette beauty, and it has inspired me to let go of my beachy light locks, for a dark chocolatey brown; a refreshing look for my sister’s upcoming wedding.

The new Duchess always made dark hair so glamorous. (Photo by Max Mumby/Indigo/Getty Images)
No regrets

In the past I have gone darker with tons of regret, and I’ve learned a lot from the mistakes I’ve made. All the pitfalls of dying darker were results in hair color that was either too dark, too green, too inky, or too flat. Here are my tips from going lighter to darker and loving it:

  1. Go for drama: Going only one shade darker will not be noticeable and has no mystery or depth. I recommend aiming for 3-4 shades darker for the freshest change. Sometimes it’s scary getting a dark color because it’s so intense! But I have a tip to combat this (see tip #4).
  2. .Choose demi-permanents: When getting hair darker, pigment is being added to the hair shaft, and only needs to be on the surface, unlike lightening that has to go deeper to remove color.  A less harsh way of dying is by using demi permanent colors. Because they use less peroxide, they are gentler to hair than permanent color, and add deeper tones. It’s also easier to lighten hair back with a demi if not truly satisfied.  Demis, unfortunately, will fade faster, but at least the fade will be less brassy since less pigment is lifted with a low peroxide dye.
  3. Notice the hair tone you are starting with: Previously lightened hair has a certain base tone to it that is very visible. It can be neutral, golden, red, or ashy. The base color that a darker color will lay over, should be on the warmer side, since red and gold tones are what makes dark hair pretty. If the starting hair color is very translucent and pigment free, sometimes adding an redish auburn color first is needed to create depth before adding a darker color on top.
  4. A trick I use for not going too dark and inky: Buying two shades. Demi permanent color always processes darker than the sample swatch since it is adding color and not lifting anything. For example, starting with light brown hair and adding a light brown demi, the results will be dark brown because of layering. To keep hair from being too intense in darkness, I like to dilute my dark shade with a blonde or clear color by a ratio of 1:1 and use the right amount of activator accordingly. This makes sure you are getting the dark color you want, while the texture of each strand and subtle highlights are still visible…resulting in more faceted color.
My Own Results

To get my hair to Meghan Markle dark, I had to be careful or else I would get something too dark and flat. So I used an ashy brown mix of colors on my warm roots, (Wella Demi in 5N and 7A) and then a neutral brown mix on my midshaft and ends, since they had an ashy light tone (wella demi in 5N+8N). I diluted the brown color by adding some blonde shades to both mixes of color.

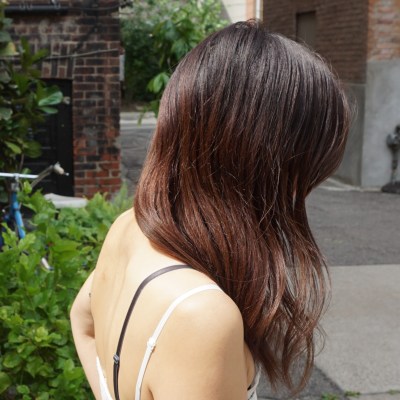
See how in the sun, it’s visible how the back and ends of my hair picked up the dark demi permanent differently. It was also ashier because of previous lightening.

The only thing I had to tweak after darkening was the different color on my midshaft and ends. The back of my hair was so light from previous dye jobs, it didn’t pick up the demi fully, and was also a cooler tone. I fixed this by doing another treatment, a rinse of auburn red in a semi permanent color. (Semi permanent is peroxide free and like a conditioner with dye, no activator needed). And now hopefully, I feel my hair is uniformly dark and mysterious!

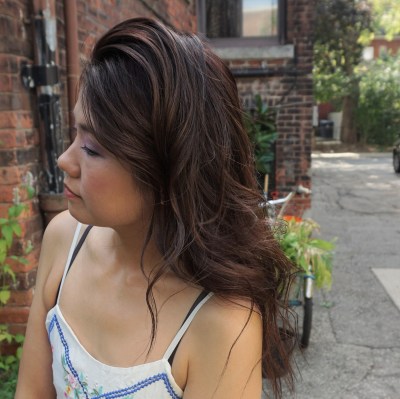
After the rinse in an auburn red semi permanent to fill in my mid-shaft and ends. Nice and evenly dark. Yay!