Making the Contoured Face Trend look fresh, not chiseled:

The contouring makeup trend is upon us, and has been for a while…the only thing is the aesthetic is rather angular, high impact and not soft or natural. For those unfamiliar with the trend, contouring is a foundation application that uses different shades of foundation on the face to create low lights and highlights blended together to give an illusion of depth and dimension. It’s a visual trick. Light surfaces move forward and dark surfaces recede back. It’s actually an illusion to create, the appearance of high cheekbones, an eyelid crease or skinnier cheeks…

My problem with contouring is that it looks painted, unnatural and is based on fooling the beholder, instead of accentuating the natural beauty one’s face already has. It is about following the beauty standards that pointier noses are prettier, or shallow cheeks are better, and that roundness is not. Rounded features I find are youthful, cute and joyful. These features can be desirable things…

I have stayed away from the contouring trend thus long, only recently adopting a more modified version of contouring. No bronzer, and no high contrast lines that need blending. Just airy bliss. I started using a highlighter to make my face glow a bit more, to look more awake and to accentuate what I already have. For me, this is the perfect compromise…looking bright-eyed and bushy tailed, but not overly harsh or made up.

How I use highlighting daily:

  1. After moisturizing, I apply my favourite foundation. These days I’m loving the Revlon Photo Ready Color Stay foundation with an spf of 20. It gives me added protection from UV rays, while still giving me a creamy, barely there coverage..
  2. Here’s where it gets fun. Add in a highlighting pen, crayon or cream. Any brand will do as long as it is lighter in shade to your real skin tone. There needs to be a reasonable difference in shade between the highlighter and foundation. Too light and it looks unnatural, but too close and it looks like nothing…

    As I mentioned in the steps the best places to highlight: the nose bridge, the forehead, the corner of the eyes, the bags under the eyes, and the cheekbones. Oh, also the cupid’s bow on top of the lips.
  3. I gently draw the lighter color onto my face. Must hit areas: the cheek bones, the crease at the bottom of any eye puffiness, the corner of the eyes, a small triangle on the forehead, the ridge of the nose, my cupids’ bow above my lips, and last but not least a round spot on my chin.
  4. The magic happens when I blend the makeup shades by dabbing a blending sponge on the edges of the highlighted spaces to create a blurred effect. Once all blended, I dust lightly with ;face powder to set and all looks beautiful!
  5. I then apply my eye makeup as usual and end with 2 generous coats of my current favorite mascara…

I feel this leaves me with a dewy, flawless glow on my face that just looks natural as if I was born with it…and not trying to fool the onlooker. Because at the end of the day, makeup is supposed to make me look better, but not like somebody else.
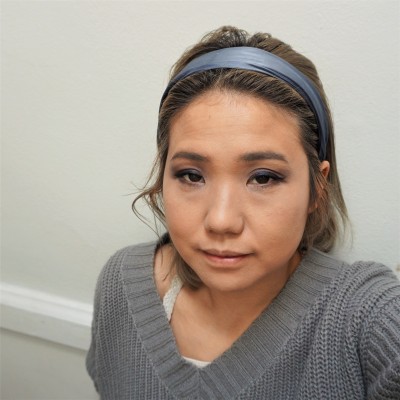
The finished product. Don’t I look alive but not too chiseled? That’s what we want!

“Pretty-sad”…A make up look that is all about being sad…

I grew up in the 90’s…a decade that was marked with uncertainty for the youth in a baby boomer run society, and the idea that kids might not be okay. Teenagers were involved in the culture of sad, dealing with depression and anxiety. The 90’s culture, music, shows, movies made being sad more visible in the mainstream. Present day, it seems as if a new generation of happy, well adjusted teens has since replaced the stringy hair, grungy, plaid-clad youth of my teens. And so…as homage to my youth I created the “pretty sad” make-up look.

What is the “pretty sad” make up look? It’s the way one might look after crying and realizing there is no escaping life or destiny. Eyes are red from crying, perhaps at unrequited love, and make-up is not perfect. Half covering up the emotional damage, half smeared and old. Pretty sad is about looking little unwell, fragile and affected. And in a way, I think it’s pretty cool. Sometimes one has to let sadness and weakness surface…as a means to purge these feelings. After all it is much better to look sad than to actually be sad!

Sad Girl Make-up Steps:

  1. Prep and even out the face. Here’s the time to use a tinted moisturizer or a sheer coverage foundation/bb cream. Set with a light dusting of face powder. Why go so sheer? This look is about looking undone. So some facial flaws and blemishes actually look right.
  2. Eyes: The eye make-up will sell this look. What is needed in a good shadow base, and then pinky red eye shadow over the top lid and line the bottom lid too. It gives the eyes a slightly irritated look. As if tears were shed not too long ago! Also line the bottom lid with a thin line of dark shadow as if a liner was once there but has since been cried off.
  3. Liquid liner: Here’s the fun part…don’t do a perfect line. make it blotchy, make it smudged. As if the eyes were wiped a few times with tissues.As if eye liner was quickly reapplied. Get creative with it.
  4. Smudged mascara: use heavy coats of mascara and before it dries, blink eyes tightly together and voila…it’s a smeared, cakey mess!
  5. Blush just on the nose: Ever cried and had a red nose? Yes! Take some blush and power the tip of the nose, the nostrils and the undersides. It’s cute in a pouty way.
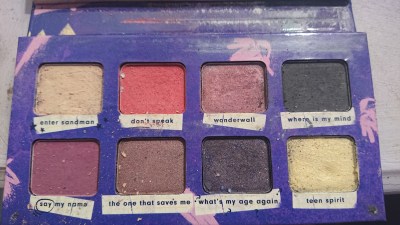
This is the “I’m with the band” palette by Essence makeup. See the red shadow in the middle top row? That’s the one to use for a sad makeup look.
Lookin’ like a mess, but feeling ok. Sad make up at its best.

And there you have it. The make-up look that speaks of the melancholic pain that haunts the soul. Have the eyes of a poet, while having the elegance of a made up face! I did this look for school last week and my instructor commented on how I looked sad that day. But the truth was, it was all cosmetic and I was simply celebrating the right and beauty to let oneself be sad.

What is brassiness in hair?

Okay so in the hair coloring world, this term is thrown around a lot, and it is often seen as a villain in hair color. Yes, we want rich brunettes, cool blondes, and vibrant reds, but brassiness? No, we avoid the color like the plague. But what is brassiness? How do we identify it? How do we get rid of it? These are all questions that used to boggle my mind until I went to hair school and got a deeper education in hair color. Brassiness is not really a color in my opinion.

To me, brassiness is actually the tones that are left behind when hair is absent of it’s cool pigments. It is the leftover color of hair that lightener doesn’t lift. For darker hair, that leftover is red/orange (unless more than 4 levels of lift is achieved), and for lighter hair the leftover pigment is orange/yellow. That leftover color (true “brassiness”) looks bad because it’s not an actual hair color, but a hair color under construction. The right color must be placed on top of it.

Brassiness often appears in hair that not lifted enough to support a lighter color, and too much warmth shows through the color. Another scenario is when toner (a hair color tint) used to correct yellowish blonde hair doesn’t take or washes out. And as a general rule even permanent hair dyes eventually wash out exposing brassy color in the hair

In the end, I don’t think brassiness is the enemy of hair color, but it’s the con of chemically lightning and coloring hair. Artificial colors will eventually fade and change due to the daily environment (sun, wind, shampoo, chlorine)…and fighting this change in hair color has become unfortunately routine  It’s with re-coloring faded color as a solution. It’s what hair colorists are here for and why as a business, there will always be repeat customers…I think it’s fine price to pay for our preferred hair color, as long as we give our hair a rest between color treatments.

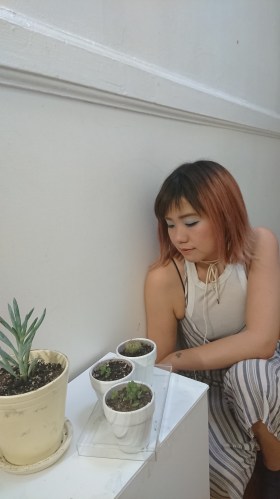
I lightened myself to a level eight to try and support a pinky color… But even at a light level the leftover warmth shows through a bit making the color more of a peach. But I still like it! (not brassy because it’s wanted)