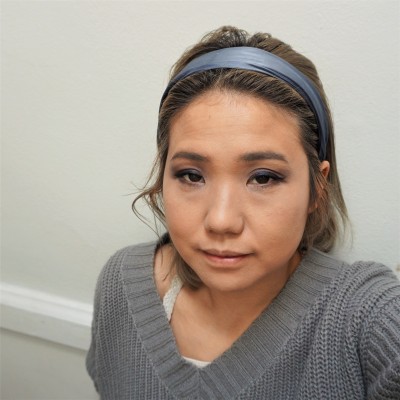
The contouring makeup trend is upon us, and has been for a while…the only thing is the aesthetic is rather angular, high impact and not soft or natural. For those unfamiliar with the trend, contouring is a foundation application that uses different shades of foundation on the face to create low lights and highlights blended together to give an illusion of depth and dimension. It’s a visual trick. Light surfaces move forward and dark surfaces recede back. It’s actually an illusion to create, the appearance of high cheekbones, an eyelid crease or skinnier cheeks…
My problem with contouring is that it looks painted, unnatural and is based on fooling the beholder, instead of accentuating the natural beauty one’s face already has. It is about following the beauty standards that pointier noses are prettier, or shallow cheeks are better, and that roundness is not. Rounded features I find are youthful, cute and joyful. These features can be desirable things…
I have stayed away from the contouring trend thus long, only recently adopting a more modified version of contouring. No bronzer, and no high contrast lines that need blending. Just airy bliss. I started using a highlighter to make my face glow a bit more, to look more awake and to accentuate what I already have. For me, this is the perfect compromise…looking bright-eyed and bushy tailed, but not overly harsh or made up.
How I use highlighting daily:
- After moisturizing, I apply my favourite foundation. These days I’m loving the Revlon Photo Ready Color Stay foundation with an spf of 20. It gives me added protection from UV rays, while still giving me a creamy, barely there coverage..
- Here’s where it gets fun. Add in a highlighting pen, crayon or cream. Any brand will do as long as it is lighter in shade to your real skin tone. There needs to be a reasonable difference in shade between the highlighter and foundation. Too light and it looks unnatural, but too close and it looks like nothing…

As I mentioned in the steps the best places to highlight: the nose bridge, the forehead, the corner of the eyes, the bags under the eyes, and the cheekbones. Oh, also the cupid’s bow on top of the lips. - I gently draw the lighter color onto my face. Must hit areas: the cheek bones, the crease at the bottom of any eye puffiness, the corner of the eyes, a small triangle on the forehead, the ridge of the nose, my cupids’ bow above my lips, and last but not least a round spot on my chin.
- The magic happens when I blend the makeup shades by dabbing a blending sponge on the edges of the highlighted spaces to create a blurred effect. Once all blended, I dust lightly with ;face powder to set and all looks beautiful!
- I then apply my eye makeup as usual and end with 2 generous coats of my current favorite mascara…
I feel this leaves me with a dewy, flawless glow on my face that just looks natural as if I was born with it…and not trying to fool the onlooker. Because at the end of the day, makeup is supposed to make me look better, but not like somebody else.

