Vinegar hair rinses…should you give them a go?

A year or so ago, I read on a beauty blog about rinsing your hair in a vinegar water solution after shampooing.  And for some reason, I cringed at that extra step in hair care, and did not consider trying it.  After all, I was already triple conditioning on top of other shower rituals that I had, so measuring out a vinegar solution ratio seemed too much, especially since I didn’t even know what it did.  The article said to use apple cider vinegar mix it with water and pour it into hair after shampooing.  The writer said it balances the hair’s ph.  And since I didn’t know what that meant, I ignored this strange tip.

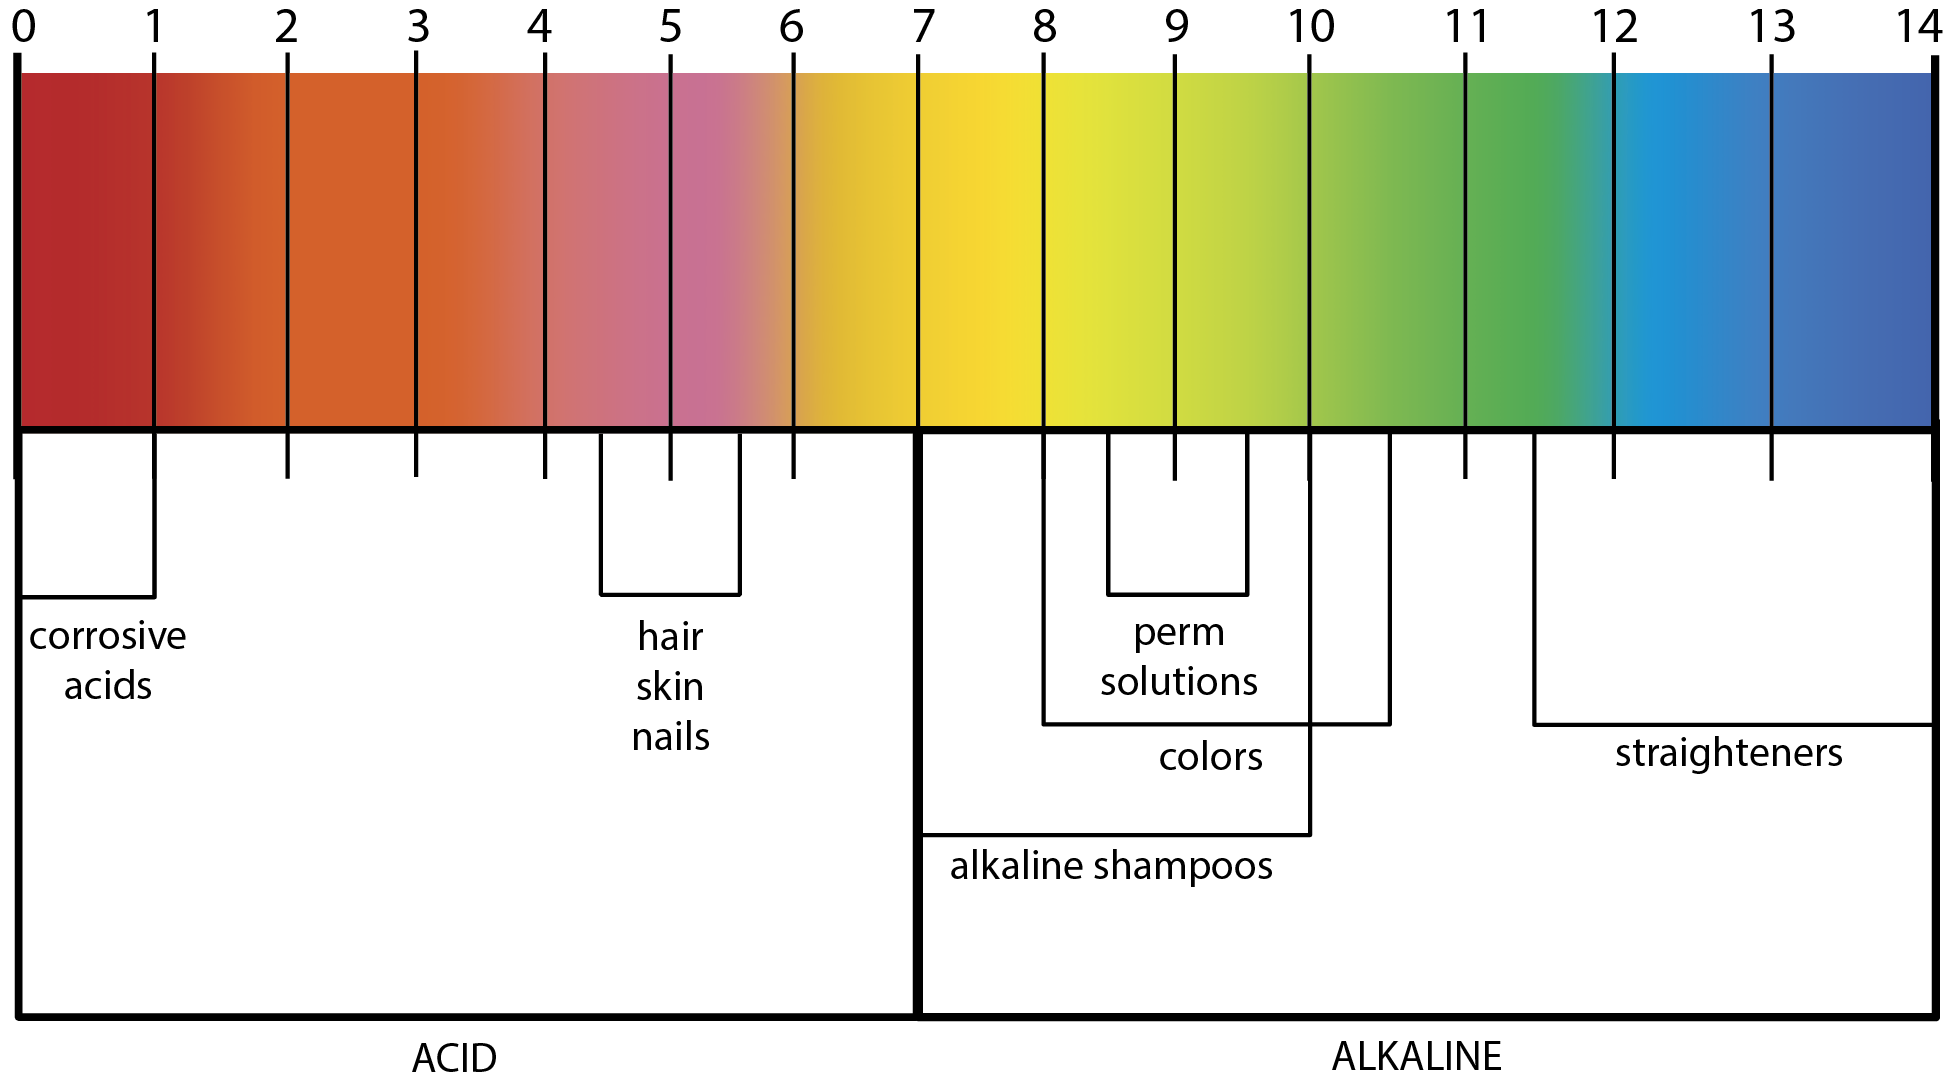
But more recently, I wanted to learn about rinsing with vinegar since I heard it can fix dull, limp hair.  I had been noticing how my hair felt stringy and dry even when it was freshly cleaned.  Adding too much products made it greasy and flat, so after more research, I was brought back to this simple home remedy.  Vinegar does balance the natural ph of hair, since hair is naturally slightly acidic.  After we shampoo, and rinse out our hair with water (neutral ph), our hair shafts remain slightly basic (because shampoo is basic), and that is on the opposite spectrum of acidic.  So your hair is not really “happy” and reacts by being limp, dull, hard to comb and needing tons of product to keep it behaving.  A vinegar rinse is supposed to cancel out what the shampoo did, bringing your hair back to its slightly acidic ph.  Yay, science!  But so what does balanced hair ph do?

I got this chart from the site: It shows how hair and skin is not actually neutral like water, and how shampoos are slightly basic on a ph scale.
I got this chart from the site menscut.com: It shows how hair and skin is not actually neutral like water, and how shampoos are slightly basic on a ph scale.

The results are supposed to be shinier hair, more soft and less dry.  A vinegar rinse is supposed to also get rid of product build up too, but I find mostly what it really does is coax your hair cuticles to lay flat and relax, so that it actually looks and feel healthier!  And less tangle-y.  I find after rinsing and drying, my hair feels thicker and stronger like almost like virgin unprocessed hair.  And I do use less leave-in products because it feels more manageable.  Translation, vinegar rinses make good hair days even better.  Infact, my own dad who never notices hairstyles, finally commented that he sees I have it dyed burgundy!  I think I owe this to vinegar rinses because they are rumored to enhance and preserve the dye in coloured hair.  So I would recommend this strange hair care trend indeed! (Don’t do it every shampoo, but every other…I hear that too much is not good? Correct me if I am wrong)

How I do a Vinegar Hair Rinse:

-2 and 1/2 cup of warm water.

-1/4 cup of vinegar (apple cider vinegar, but I actually use white vinegar)

Mix in a pitcher before your shower.  After shampooing and conditioning, seal in your hair cuticles by pouring the mixture all over your head and hair all the way to the ends.  Massage and bring the solution all the way to the tips of your hair.  Leave on for a minute, then rinse out with a blast or two of regular water.  I don’t want to rinse it all out, but I get out the excess because it does have an odor.  However, after it dries, it has no scent.  But don’t be caught in the rain because I find when my hair gets damp again, I can sometimes smell like fish and chips.  Oh well, the results are worth it!

Look at my long strands! After using the rinse and drying, they are still untangled after a night of sleeping on with no products put in! That is usually impossible with my hair.


Summer skin care: sun protection is key!

I recently discovered summer skincare is very different from the rest of the seasons.  I think because in Canada, we really only have two months of summer.  UV rays from the sun are present and dangerous all days of the year, but there is something about summer that just scorches and you can actually feel its damage. In all the other seasons we can be indoors a lot, but not in summer.  I like getting outside, but I never really was a fan of the tanned look, and well, I am kind of afraid of the premature aging that is said to happen to from frequent tanning and sun exposure.  And even with vanity aside, developments of skin cancer are unfortunately proven to be higher for people who love the sun too much. 😦

This was an outdoorsy summer.  I was on a trip to beaches near Lake Erie, and it was not a good time to forget the hat.  I got baked on that trip.
This was an outdoorsy summer for me. I was on trips camping, trips to lakes and beaches.  So it was not a good time to forget the hat. I got tan lines all over my collar and the summer is only half done!

Staying away from the sun is easier said than done.  This summer is an active one for me.  I walk a lot everyday with my kid for errands and exercise, I also just came back from a weekend at the beach, and the previous weekend I had gone camping.  I see all these tan lines on my collar, and although I know that my natural sun block is protecting me to some degree, I am also getting a lot of sun exposure and sometimes I was forgetting to put it sunscreen on!  Yikes! (At least I have no shortage of vitamin D recently) But still, I have to be careful for the rest of this summer, because though I have been skipping heavy make-up, I can’t skip sun protection.

My 6 Summer Skin Savers:

1) My cocoa butter & zinc oxide sunscreen, SPF unknown, since I make it myself.  It goes on a bit streaky, but knowing it’s all natural makes me and my skin happy on blazing summer days.  It is a bit greasy, so it must be worn on its own, not under make-up.  And I spread it everywhere that is getting exposure.

2) Rose water skin toner.  Also all natural, since my toner is literally just rose water straight from any supermarket. I put the bottle in the fridge and dab it on with a cotton ball whenever I need refreshing on my face.  Toners are generally used after face cleansing. But you can use rosewater anytime your face needs a splash of actual moisture and it smells so wonderful.

3) BB Cream!  I know there is a bit of a debate over which is better: BB cream or foundation.  But for SPF protection, BB’s are unparalleled.  Most of them are 25 SPF and up, and that’s only one of the many things BB creams multitask at.  They also provide coverage and blurring effects for the summer days that you still need to look a bit more polished.  Soften bb cream’s heavier coverage by skipping powder and you get a natural dewy, slightly shiny look that is supposed to be “in” at the moment, while still getting the sun protection that you need. Also powder make-up can turn cake-y in hot weather–not the best looking.

4) A big straw summer hat. Worn not for fashion, but for a constant shade for your face. Not necessary the most cooling item to wear on top  your head during a hot day, but a MUST to keep your face and collar in the shade, away from intense sun.  I went strawberry picking during the weekend and without it, I would have been seared by the midday rays!

5) Best stay indoors during the hours of 11am-4pm.  Unless you have to, why do your outdoors activities under the hot midday sun?  The intense heat of the summer sun at that time also puts you at risk of a heat stroke.

6) Drink lots of water.  Skin does hydrate from the inside out too, so the hotter the weather, the more water you should be drinking.  I don’t like sodas or sugary drinks that much, so ice water is my go to for hydration!

Shying away from the sun is good.  I got in my hand my current bb cream from Holika Holika at SPF 30 and my sun hat from Ardene's for only $12, so there is no excuse not to shade yourself!
Shying away from the sun is good! I got my current bb cream from Holika Holika at an spf of 30, it has a natural coverage.  And my sun hat from Ardene’s was only $12! so there is no excuse not to protect yourself!

There is totally nothing wrong with sunning or tanned skin.  I don’t necessarily think pale skin looks better.  Mostly, I like to think about what is best for the health of my skin in the long run, which would appear to be less sun.  What are your favourite summer skin savers?


Make your own dry shampoo so you can sleep-in during mornings!

Lazy is good.  It’s great actually.  When it comes to shampooing hair, there is nothing more healthy for your scalp and hair than skipping as many days as you can between shampoos.  The reason is simple.  Shampoos are harsh.  They strip away natural oils, you use a lot of friction to make them lather, and your hair (unlike a pair of distressed jeans), do not look better when they are put through the washer and dryer.  On the other hand, oily strands of hair do not look polished or pretty either.  A solution?  Dry shampoo.  When I use dry shampoo, I can go a up to a week between washing with a regular shampoo.  This is great in two ways:  It is healthier for your hair, and also it saves you plenty of time in the morning because you don’t have to shampoo and condition in the shower, and you don’t have to restyle/shape your hair again. I dust dry shampoo in my hair roots, and it looks as if I had showered and re-curled my hair! A handy and healthy short cut to clean hair.

So this is my hair after a few days without washing.  Kinda gross and oily as you can see.
So this is my hair after a few days without washing. Kinda gross and oily as you can see.

The best part is it really isn’t cheating.  Your hair is actually getting cleaner with the use of a dry shampoo.  The reason is is that oily hair is a magnet for dust and dirt.  When your hair is oily, particles of dirt stick to it, making your hair more “dirty” as each day without a wash passes. Dry shampoo works by soaking up the oil, along with any unwanted dirt, then falling out of your hair.   So technically, a dry shampoo really does “shampoo” your hair and clean it.  It is not a cosmetic effect, it  cleans by absorbing grease and oil and it is not as “gross” as some people may think.

Doesn't my hair look a lot cleaner and better?  It took two minutes with a dusting of dry shampoo.
Doesn’t my hair look a lot cleaner and better? It took two minutes with a dusting of dry shampoo.

How I use my own homemade dry shampoo is simple. On day 3 or 4 I dust in a thin amount of dry powder into the roots to mid shafts of my hair all over.  I actually use a blush brush and dip it into the bowl of dry shampoo and then brush it all over.  I like using a blush brush because there is more control, but you can also use a shaker type container to shake it in.  Then once applied shake and massage your head and hair so it can do it’s magic.   Then simply comb gently.  Thou’st ready to go out now!

Simple recipe for home made dry shampoo:

1 part cornstarch (absorbs oil like crazy)

1 part arrowroot flour (absorbs oil, but is softer in the hair)

1/3 part cocoa powder ( this ingredient is optional for those with darker hair)

Mix and blend all three powders until consistency is smooth and uniform.  I like to add jasmine and rose oil drops to make the shampoo smell amazing!

I keep my dry shampoo in a tin and dust it into my hair with a blush brush.  So easy, and fast too!
I keep my dry shampoo in a tin and dust it into my hair with a blush brush. So easy, and fast too!