Anti-quarantine Glam Make-up looks…

The worldwide lock down has brought my spirits down as well. Physical distancing has bound everyone to their homes hiding or imprisoned; letting one’s appearance go is sadly is the new normal daily life. No hair or nail salons, no spas or gyms…basically no beauty allowed.  And with myself being in the beauty industry, I’ve been unemployed for six weeks now. I’m so bored with my inner thoughts and no amount of youtube, disney + or netflix can distract me from myself. I’m trying not to gain a ton of weight during my unemployed home times, and I’m basically living day to day wondering the necessity of pants. This is a dangerous time. I wanted to find a way to make social distancing more bearable. So what better than to share some glamourous full face make-ups suitable for happier days. These make-up looks I have designed are useless during the lock down, but give me something to look forward to wearing post covid, when all eyes may be on myself and the beauty of others!

Plum Smoke Romance:

I originally did this look for valentines, and I liked it a lot for the flirty sultry aspect. Plum is also a lot more inviting and interesting than the usual charcoal/grey smokey eyes.. So here is how to get it…

  1. Prepping the face…for this look, the less shine, the better. everything has to be matte and smokey. That includes the foundation, concealer and powder. I will even do my eye shadow base in a matte nude color.
  2. Define and fill in brows: pretty standard in all make-ups actually.
  3. Find a matte plum eyeshadow and sweep it on the whole lid from eyelash line all the way to the brow bone. Smoke out and deepen the plum with a charcoal violet shadow for a second coat on the entire eye lid.
  4. Using a soft eyeliner, line the top lid and smudge the line with a dark shadow to blend and set the liner. Use that same shade for the bottom lid and line the outer corners of the eyes.
  5. Two coats of mascara always, and falsies if desired. Blush is optional for this look and I kinda prefer without.

Carefree and smokey. I have dark days too.

Playboy Bunny Neutrals:

I made this look one Halloween when I contemplated donning the iconic  playboy bunny costume. The elegant body suit with stockings, bow tie, ears and tail. It’s pure feminine prowess at it’s best. The make-up for this look is a glam relies heavily and a retro cat eyeliner and shimmering nudes and taupes and goes well with any going out outfit.

  1. Foundation and concealer as always. Concealer is particularily important for a flawless matte complexion. Add powder generously.
  2. Fill in brows bushy and fluff them up fully!
  3. Matte shadow base all over top and bottom lid. Shimmer eyeshadow just on the bow bone and inner corners.
  4. Dark shimmer taupe shadow in the crease. Shimmer nude in the main center upper lid. Line with black pencil. Set the pencil line with a dark shadow, black or brown…outline the bottom lid with a bit of the same dark shadow (just the outer corners)
  5. Do a dramatic cat’s eye liner with liquid liner.
  6. Add two coats of mascara and falsies of desired.
  7. Use a matte blush on the cheeks.
  8. Finish with a red lipstick matte or gloss.
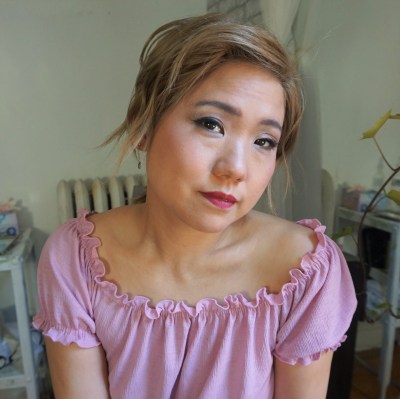
I do like to be girly sometimes. What better than to don a neutral glam look.

Ice Blush Princess:

If one could be the fairest in all the land!  Magical and fancy, pretty yet cool, behold the ice princess make-up. With ice pinks and plenty of dewy glow it’s a grown up way to show off baby doll pink.

  1. Moisturize the face with a non greasy lotion: This looks best when the skin is highly mosturized. Cool shimmery colors show every crack/crease on the face when it is too dry.
  2. Foundation and  concealer or brightening serum under and around the eyes is key to achieving that flawless glow; use face powder lightly to set. Finish brows with and filler and fluff aiming for a natural definition.
  3. Shadow work: Neutral non shimmer eye shadow base on top lid. Shimmering highlight shadow on bottom lid and inner eye corner and brow bone under the brow. Blend lightly with a blending brush. Dark mauve pink for the crease, and cool true pink shadow for the main lid area, Blend.
  4. Black eye liner tight lined to the upper lashes. Smudge the pencil line with charcoal gray shadow to widen and smoke up the line. Use the same gray shadow for bottom lid line (just the outer edges)
  5. Double coat of mascara. Falsies if desired! Spray with a dewy setting spray for moisturizing to take away any remaining powdery look!
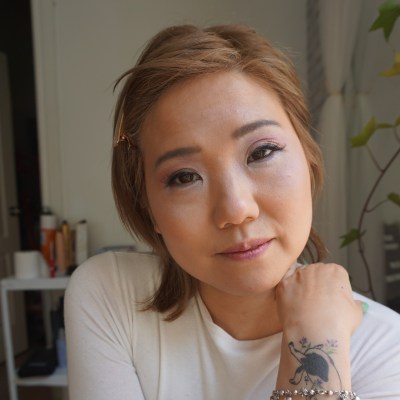
Ice pinks are so subtle. But hopefully my shiny color palette is visible here.

So which look is the most glam and fitting for me? I like all three and am happy to have been able to try out these looksduring these sad times of having no reason to get dolled up and be glamorous. Hang in there…beauty will reign supreme again some day.

Making the Contoured Face Trend look fresh, not chiseled:

The contouring makeup trend is upon us, and has been for a while…the only thing is the aesthetic is rather angular, high impact and not soft or natural. For those unfamiliar with the trend, contouring is a foundation application that uses different shades of foundation on the face to create low lights and highlights blended together to give an illusion of depth and dimension. It’s a visual trick. Light surfaces move forward and dark surfaces recede back. It’s actually an illusion to create, the appearance of high cheekbones, an eyelid crease or skinnier cheeks…

My problem with contouring is that it looks painted, unnatural and is based on fooling the beholder, instead of accentuating the natural beauty one’s face already has. It is about following the beauty standards that pointier noses are prettier, or shallow cheeks are better, and that roundness is not. Rounded features I find are youthful, cute and joyful. These features can be desirable things…

I have stayed away from the contouring trend thus long, only recently adopting a more modified version of contouring. No bronzer, and no high contrast lines that need blending. Just airy bliss. I started using a highlighter to make my face glow a bit more, to look more awake and to accentuate what I already have. For me, this is the perfect compromise…looking bright-eyed and bushy tailed, but not overly harsh or made up.

How I use highlighting daily:

  1. After moisturizing, I apply my favourite foundation. These days I’m loving the Revlon Photo Ready Color Stay foundation with an spf of 20. It gives me added protection from UV rays, while still giving me a creamy, barely there coverage..
  2. Here’s where it gets fun. Add in a highlighting pen, crayon or cream. Any brand will do as long as it is lighter in shade to your real skin tone. There needs to be a reasonable difference in shade between the highlighter and foundation. Too light and it looks unnatural, but too close and it looks like nothing…

    As I mentioned in the steps the best places to highlight: the nose bridge, the forehead, the corner of the eyes, the bags under the eyes, and the cheekbones. Oh, also the cupid’s bow on top of the lips.
  3. I gently draw the lighter color onto my face. Must hit areas: the cheek bones, the crease at the bottom of any eye puffiness, the corner of the eyes, a small triangle on the forehead, the ridge of the nose, my cupids’ bow above my lips, and last but not least a round spot on my chin.
  4. The magic happens when I blend the makeup shades by dabbing a blending sponge on the edges of the highlighted spaces to create a blurred effect. Once all blended, I dust lightly with ;face powder to set and all looks beautiful!
  5. I then apply my eye makeup as usual and end with 2 generous coats of my current favorite mascara…

I feel this leaves me with a dewy, flawless glow on my face that just looks natural as if I was born with it…and not trying to fool the onlooker. Because at the end of the day, makeup is supposed to make me look better, but not like somebody else.

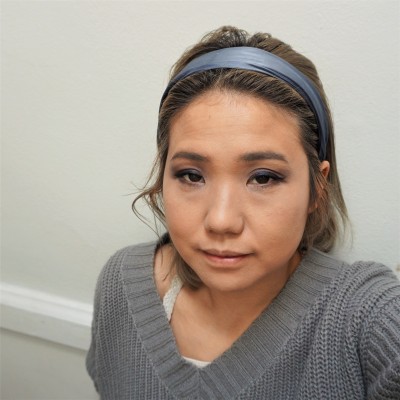
The finished product. Don’t I look alive but not too chiseled? That’s what we want!

6 Easy Make-up Tips to keep you looking Fresh this Summer

So, in Toronto, as with a lot of places in North America, spring really came late, but suddenly, with our last snow storm just only 2 weeks ago!! How can we recover so fast to be able to be ready and enjoy this burst of sunshine and mild temps now that May is finally here? My make-up these days is lighter, with less layers, andless ink; my motto as always been less is more. I want to use less make-up products these days, because my eyes have been kind of puffy lately, and I’m not about to outline they are with tonnes of black liner…But I still like a made-up face when possible, and here are some easy, breezy tricks to make it look like you are effortlessly gorgeous:

Nothing says spring like a terrarium with succulents! With it some of my current cosmetic arsenals…

Top Summer make-up hacks

  1. Follow a full face make up with a blot with a kleenex tissue: This one is so important! Because in the summer, we are usually using either a foundation with SPF, or a separate SPF, and the layers of protection gets kind of oily and thick. Reduce the look of wearing a “make-up mask” by blotting with a soft tissue all over the face after applying your full make-up. The tissue catches loose pigment and excess oils that sit on top of your face, the thing that causes you to look “made up” and unnatural. I find a kleenex is better than blotting paper since it’s texture can pick up loose make-up too, and not just oil.
  2. Wear an SPF! I can’t say this enough, and it’s really just because in the late Spring, the sun is actually at it’s closest to the earth, but without the heat to signal it’s penetrating our skin! UV rays from the sun is linked to skin cancer and also sunspots, wrinkles, and skin aging. So be sure to use SPF during the spring and summer!
  3. Use the right foundation color: I know in Asia, the trend is to be lighter, and here in NA, it’s to be darker tan…but my advice is to match your actual skin color. There is never going to be a color more flattering than getting the exact shade and tone of the face. Don’t pretend to be a porcelain princess or, a tanned surfer girl, because matching your true skin color will make you look like yourself, and more natural. Even if it means mixing two shades to get it right, as I currently do…
  4. Hair Trends: When it comes to hair lightening, any level lighter than brown hair (bronde to platinum) looks best with dark roots, 1-2 inches. Having uniform color from root to tip looks very artificial for some reason, even though having roots is a sure fire sign of colored hair. But for some reason, darker roots give your face and hair more dimension and drama, and also makes lightened hair look even lighter. Be sure to soften the root line so that where the roots end doesn’t look like a harsh line. A skilled hair stylist will know how to do this if you don’t!
  5. Add a shimmer to your bottom lid: For those of you with puffy eyes, and small bags underneath them like I do these days, will appreciate this tip. Shimmery bright shadow on the bottom helps brighten and take attention away from bags by bring up the visual focus. For those who don’t use shadow on the bottom lid; always use a shadow there, even if it is a nude color. It keeps your eye make-up from smudging when you blink all day and when moisture from your eyes touches your top eye make-up.
  6. Avoid heavy mascara: Did you ever wonder why you don’t have the fluttery lashes you see in all the make-up ads when you put on mascara? Sometimes my lashes just look inky and heavy after mascara application. My quick remedy for this is to take a clean finger tip and just dab and push up on the lash right after mascara application. This will wipe off any clumps and naturally separate lashes, while evening the mascara application and keeping it light and wispy. Another bonus? It helps prevent smudging or flaking from occurring later in the day since it also removes excess black on over painted lashes. A must do.

So ya, these are my tricks I’m using to keep fresh this summer, do you agree with them? If so, you can enjoy wearing make-up this spring without looking over done, made up and weighed down. Hopefully these tips work for you and feel free to share your own tips in the comments section below!