6 Easy Make-up Tips to keep you looking Fresh this Summer

So, in Toronto, as with a lot of places in North America, spring really came late, but suddenly, with our last snow storm just only 2 weeks ago!! How can we recover so fast to be able to be ready and enjoy this burst of sunshine and mild temps now that May is finally here? My make-up these days is lighter, with less layers, andless ink; my motto as always been less is more. I want to use less make-up products these days, because my eyes have been kind of puffy lately, and I’m not about to outline they are with tonnes of black liner…But I still like a made-up face when possible, and here are some easy, breezy tricks to make it look like you are effortlessly gorgeous:

Nothing says spring like a terrarium with succulents! With it some of my current cosmetic arsenals…

Top Summer make-up hacks

  1. Follow a full face make up with a blot with a kleenex tissue: This one is so important! Because in the summer, we are usually using either a foundation with SPF, or a separate SPF, and the layers of protection gets kind of oily and thick. Reduce the look of wearing a “make-up mask” by blotting with a soft tissue all over the face after applying your full make-up. The tissue catches loose pigment and excess oils that sit on top of your face, the thing that causes you to look “made up” and unnatural. I find a kleenex is better than blotting paper since it’s texture can pick up loose make-up too, and not just oil.
  2. Wear an SPF! I can’t say this enough, and it’s really just because in the late Spring, the sun is actually at it’s closest to the earth, but without the heat to signal it’s penetrating our skin! UV rays from the sun is linked to skin cancer and also sunspots, wrinkles, and skin aging. So be sure to use SPF during the spring and summer!
  3. Use the right foundation color: I know in Asia, the trend is to be lighter, and here in NA, it’s to be darker tan…but my advice is to match your actual skin color. There is never going to be a color more flattering than getting the exact shade and tone of the face. Don’t pretend to be a porcelain princess or, a tanned surfer girl, because matching your true skin color will make you look like yourself, and more natural. Even if it means mixing two shades to get it right, as I currently do…
  4. Hair Trends: When it comes to hair lightening, any level lighter than brown hair (bronde to platinum) looks best with dark roots, 1-2 inches. Having uniform color from root to tip looks very artificial for some reason, even though having roots is a sure fire sign of colored hair. But for some reason, darker roots give your face and hair more dimension and drama, and also makes lightened hair look even lighter. Be sure to soften the root line so that where the roots end doesn’t look like a harsh line. A skilled hair stylist will know how to do this if you don’t!
  5. Add a shimmer to your bottom lid: For those of you with puffy eyes, and small bags underneath them like I do these days, will appreciate this tip. Shimmery bright shadow on the bottom helps brighten and take attention away from bags by bring up the visual focus. For those who don’t use shadow on the bottom lid; always use a shadow there, even if it is a nude color. It keeps your eye make-up from smudging when you blink all day and when moisture from your eyes touches your top eye make-up.
  6. Avoid heavy mascara: Did you ever wonder why you don’t have the fluttery lashes you see in all the make-up ads when you put on mascara? Sometimes my lashes just look inky and heavy after mascara application. My quick remedy for this is to take a clean finger tip and just dab and push up on the lash right after mascara application. This will wipe off any clumps and naturally separate lashes, while evening the mascara application and keeping it light and wispy. Another bonus? It helps prevent smudging or flaking from occurring later in the day since it also removes excess black on over painted lashes. A must do.

So ya, these are my tricks I’m using to keep fresh this summer, do you agree with them? If so, you can enjoy wearing make-up this spring without looking over done, made up and weighed down. Hopefully these tips work for you and feel free to share your own tips in the comments section below!
 

Does your hair need Hydrolyzed Protein…?

I’ve always struggled with hydrating my dry hair, because it always seems to be dry and stringy…and although it is long, it is often feeling weighed down by more than it’s own weight. I have always used my coconut oil hair salve daily and it has helped hydrate my hair to shine, de-tangling and smooth, but over use of a good thing can be bad too. Over moisturized hair from oils can leave hair feeling greasy, thin and rough. Hair color doesn’t shine as much, even if it is a fresh dye job when too much of an oil/silicone coating has taken over. But is there another way to add softness and hair vitality? I recently discovered that an ingredient called hydrolyzed protein (wheat, oat, silk, keratin) can do wonders for dull rough hair in ways that oil hydration alone can’t. Hydrolyzed protein fills in some of the gaps and roughness in your hair with an organic material that will feel kinda like new hair…when paired with a hydrating routine of conditioners/oils it’s a complete package of shine and softness.

Notice how stringy my ends are and how they seem to thin out near the bottom? They are moisturized, but not soft for some reason…it’s missing protein…
This is when I was lightening and coloring my hair a lot, and the chemical dyes saturated the shaft, but since it was missing protein, it’s not shiny, but rough in texture…

How did I find this out? While traveling during March Break and visiting Halifax in Nova Scotia, Canada, I stayed at a hotel there with spa quality toiletries. I tried their shampoo and instantly I felt a difference in my hair vitality; my hair was less wiry when damp, and the next day the strands felt plumper, reminding me of how it had been in my younger days. I knew it was not my conditioner that provoked the change since I had packed that from Toronto. It was the hotel’s shampoo. I then scoured the ingredient list on the hotel shampoo and found out the main ingredient that I didn’t have in my shampoo at home was hydrolyzed wheat protein. An ingredient that would prove to make the difference.

Havin’ a “good hair day” in this vacation photo from Halifax at the Nautical Museum. After using the hotel’s shampoo the night before, it felt softer, silkier than before. Can you see this in the photo?

Back in Toronto now and using a shampoo with a hydrolyzed wheat protein. And am really liking it. But I only have protein in my shampoo, since I hear that using too much protein can cause hair to be brittle! Everything in moderation it seems!  My main tip for true hair health though is to rely less on hair care products and just treat your hair well. Do you really need to have the unicorn hair color that requires bleaching it to white, or do you need your hair to be heat styled all the time? There is no ingredient, chemical or natural that can reverse hair damage. New fangled and expensive heal-all chemicals such as Olaplex have drawbacks too, as the beauty industry has discovered (although I won’t go into detail about it this time around). Bottom line: no product or oil can substitute minimizing hair damage in the first place, so treat your hair and body well.

My current Hair Color: “Bronde” and how to get it…

(**Disclaimer! I’m not a hair professional, but have just done my research and worked with my own hair to get results I’m happy with. But whenever dying your own hair at home, please follow manufacturer’s directions and consult with a professional when possible or in doubt)

As you all know…I’ve been lightening and coloring my hair since late last year, in an attempt to get a lighter color that is neither brassy, or too harsh/dark for my complexion. Check out my articles on hair coloring and soap capping. And recently I’ve been rocking a hair color that I found out was called “bronde”; too light to be a solid brunette, and too dark to be a blonde. Kind of a caramel color in between two opposites. A nice neither region that I would like to reside in for the next little while. Why? It’s not as high maintenance as a light blonde, and it’s not as brassy as that rust color dark hairs get when they lift too little color. It’s just peachy. Check out this Vogue article about this hair color to get some inspiration. But for how, here are some famous “brondes”:

Jessica Alba: at the tonight show with just the perfect balance of light and dark caramels and soft, bouncy waves.
Amber Heard on GQ? As a darker blonde than she normally is, I think she’s got a lot more mystery and allure…
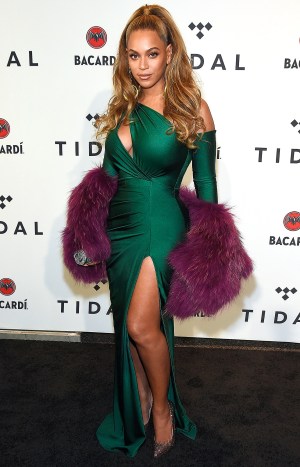
Beyonce is Bey-youtiful with a hair colour that compliments and warms her complexion. 

Okay, so you get the idea…how the color should look, but now how to achieve this neutral tone, middle level “bronde”color…Go to an expert hair stylist who does great hair color, or try it at home with these tips!**

For Brunettes want to go Bronde:

Step 1: Lighten enough: Believe it or not, us brunettes (black or brown hair) have to lift a level or two above middle lightness to achieve ‘bronde”. It’s not fair, but it’s just the way it is. For those doing this at home, you need to get to a level 7 lightness, at least. Check out swatches on how light a 7 level is.

Step 2. Tone/Glaze: This is so important as it adds the finishing shine and touches to a lighter hair color. Lightening dark hair always brings out warmth. And warmth is the enemy when trying to achieve a gentle tone in hair. Use a demi permanent hair dye with a low peroxide developer to add ash (blue/green) pigment to your strands. Use a lighter level than your hair is. So as a level 7, get a level 8/9 ash tone color. Toning with an dedicated hair “toner” only works for hair that has been lifted past a level 8.

A bit on the warm side, but I will be toning/glazing with a demi in the next week or so.

For blondes wanting to go darker to Bronde:

I’m not the most experienced in this matter, since I am a brunette, but here’s what I do know:

  • Use a demi-permanent hair color, since you are depositing only and not lifting levels. It’s gentler and from what I hear, shinier!
  • Stay away from ash tones. Ash upsets the darkening process by getting too dark/green too fast and then you’re stuck with it.
  • Always use a demi color one or two levels lighter than you want to achieve. So if I were a light blonde, I would do a 7 or 8 with warm/golden tones to get to caramel. Depending on the intensity of bronde you want, diluting the hair color formula with a clear gloss demi would be smart for avoiding over saturation and it looking flat and fake whenever dying darker.

Hope these tips help for all that want this hair color. I find it suits all skin tones and ages and just looks really healthy. Try it today.

**DISCLAIMER: all advice I give is based on my own personal experience with hair color. I’m not a professional hair stylist, so use my advice with a bit of caution and never hesitate to consult to a professional! Thanks!